Fluffy Yeast Raised Potato Donuts with Maple Vanilla Glaze

Step by Step Guide to Deep Frying Donuts at Home

by Caroline
Published: Updated:

The best donuts you’ll ever taste are the ones you make at home. These fluffy yeast-raised potato donuts boast a tender, soft texture and are topped with a satiny, maple-infused glaze. Follow this step-by-step guide to create the perfect homemade fried donuts from scratch!

Do you love donuts? Do you love FRESH donuts? If so, you’re in the right place! 

These fluffy yeast-raised potato donuts are a total game-changer. They’re light, tender, with a slight chew, and dipped in a rich maple glaze that will transport you straight to your favorite donut shop.

If you’re hesitant about deep frying, don’t worry—I was too. But trust me, once you’ve tasted fresh, homemade donuts, you’ll never look back.

In this post, I’ll share why we’re using potato as a secret ingredient, what tools and ingredients you’ll need, and tips to ensure deep-frying success.

Let’s get baking frying!

fluffy yeast rasied potato donuts

Table of Contents

fluffy yeasted potato donuts with maple vanilla glaze on a plate

SAFETY MOMENT: Always exercise extreme caution when frying in hot oil—it can be very dangerous if not handled properly. Never allow children to assist with this process.

What are Potato Donuts?

Potato doughnuts, sometimes referred to as “Spudnuts,” are a unique variation of the classic doughnut, typically made with mashed potatoes or potato starch as a substitute for a portion of the flour. 

Potato doughnuts are special because they offer a unique texture and flavor that sets them apart from traditional all-flour doughnuts. The use of mashed potatoes or potato starch in the dough creates a lighter, softer, and more tender donut with a slight chew. This gives them a melt-in-your-mouth quality that many people find irresistible.

Equipment Needed for Yeast-Raised Potato Donuts

Deep frying donuts doesn’t require fancy tools, but having the right equipment will make the process smoother and more enjoyable. Here’s what you’ll need:

  • Dutch Oven (or Large Pot): Choose a pot with a 4-6 quart capacity (a 6-quart is ideal). This size allows you to fry a few donuts at a time without overcrowding. A Dutch oven is preferred for its heavy bottom and excellent heat retention, ensuring even cooking. If you don’t have one, consider investing in a Dutch oven – they’re versatile for baking and cooking. Brands like Lodge (affordable enamel options) or premium choices like Staub and Le Creuset are excellent.

  • Tongs: While not essential, tongs are handy for flipping and lifting donuts during frying. Most kitchens already have a pair on hand.

  • Spider Strainer: This is a must-have for deep frying! A spider strainer makes it easy to remove donuts from hot oil while draining excess grease.  A large slotted spoon works ok too. 

  • Cooling Rack & Sheet Pan: A cooling rack that fits into a sheet pan is essential. It lets donuts cool evenly and prevents sogginess. The rack also allows glaze to drip off without puddling, while the sheet pan catches the runoff.

  • Stand Mixer: While not strictly necessary, a stand mixer is highly recommended. The soft dough can be challenging to work by hand, and the mixer helps achieve the perfect texture without adding extra flour. This recipe has not been tested with hand-kneading or alternative mixers.

  • Candy Thermometer (Instant-Read Preferred): Precise oil temperature is crucial for evenly cooked donuts. A candy thermometer helps maintain the correct frying temperature for golden, perfectly fried donuts.

  • Funnel: While not essential, a funnel simplifies cleanup by making it easier to transfer and store used oil. They’re inexpensive and a real lifesaver when dealing with large amounts of oil.

Ingredients for Fluffy Potato Donuts with Vanilla Maple Glaze

    • Oil for Frying: Use a high-quality vegetable oil, canola oil, or refined coconut oil. If your oil is old or of poor quality, you’ll notice the taste in the donuts. Don’t worry – you’ll be able to reuse the frying oil up to three times (depending on a few factors)! 
    • Russet Potato – Peeled, boiled, and mashed to give the donuts a soft, pillowy texture. Pick a decent size potato, around 6 ounces. You’ll only need about 3 ounces of mashed potato, but you don’t want to run out. Plus, the remaining donut can be enjoyed or saved for a second batch. 
    • All-purpose flour – Forms the base of the dough and gives it structure. If possible, pick a lower gluten flour like Gold Medal (10.5%) or Pillsbury (10.5%) rather than a higher protein flour like King Arthur (11.7%).
    • Baking Soda – Mostly for browning purposes. Just a 1/4 teaspoon. 
    • Instant (not rapid rise) dry yeast – Helps the dough rise and gives the donuts a light and airy consistency.
    • Milk (any percentage, preferably whole) – Works in the activation of the yeast, and provides richness and tenderness to the dough. You’ll also use milk in the glaze. 
    • Granulated sugar – Sweetens the dough and helps with yeast activation.
    • Unsalted butter – Adds richness and keeps the donuts tender.
    • Eggs – Provide structure and richness to the dough.
    • Vanilla extract – Adds a touch of flavor to the dough and glaze. 
    • Salt – Balances out the sweetness and enhances the dough’s flavor. You’ll also add a pinch in the glaze. 
    • Nutmeg – This is a bit of a “secret” ingredient. I’m generally not a fan of nutmeg, but it gives the donuts a classic “donut shop” taste!
    • Powdered Sugar: For the glaze. 
    • Cinnamon: A little for the donut dough, a little for the glaze.
    • Optionals: Maple syrup can be added to the glaze for added richness. If you want to make cinnamon sugar donuts, you’ll need to have at least 1/2 cup + 1 tablespoon of ground cinnamon.  

Jump to the Recipe Card for Precise Measurements

fluffy yeasted potato donuts with maple vanilla glaze on a plate

How to Make Fluffy Yeast Raised Potato Donuts

For the full recipe, jump to the recipe card. Here’s a quick breakdown of the steps you’ll be following: 

  1. Make the yeasted dough + allow it to rise (first rise). 
  2. Shape the dough + allow it to rise (second rise) – either at room temperature or overnight.
  3. Make the glaze. 
  4. Fry the donuts. 
  5. Dip the donuts into glaze. 
  6. Enjoy!
Keep reading for success tips at each stage of the process!
fluffy yeasted potato donuts with maple vanilla glaze on a plate

Making the Dough

In this step, you’ll want to keep these four important things in mind: 

  • Ensure your ingredients are at the right temperature: Follow the recipe closely! Let the mashed potato cool down before adding it to the dough. If you made the mashed potato ahead of time, ensure it’s at room temperature.
  • Mix and knead the dough long enough: 15 minutes may feel like a long time, but it’s essential for proper gluten formation.
  • Don’t be afraid to add a little extra flour: If the dough is too sticky, add a tablespoon or two of flour to help it come together. Note: The dough will gain strength as it rises, so don’t worry if it feels a little sticky during the mixing stage.
  • Monitor the rise carefully: Check the dough around the 60-minute mark and again at 75 minutes. Depending on the temperature of your kitchen, it might rise faster or slower. Use the Poke Test (below) to check its proof level.

THE POKE TEST: Gently press your fingertip in the surface of the dough. If the indent springs back slowly and fills in, the dough needs more time. If the indentation stays or only slightly springs back, it’s ready. If the dough deflates, it likely has over-proofed. 

Shape the Donuts – Tips & Tricks

This is the fun part! Here are my three key tips:

  • Weigh the Dough: To ensure evenly sized donuts (because if they look even, they cook even!), weigh each portion of dough. I typically do 14 portions, each around 65g, and reserve some of the dough for donut holes.
  • Shape the Donuts Evenly: Shape the dough into small balls with your hands. Gently flatten one and use your thumb and forefinger to create a hole in the center. Carefully stretch the dough into a 3-inch ring. The shape might be slightly uneven, but that’s perfectly fine! Try to make sure the thickness of the ring is as consistent as possible.
  • Use Parchment Paper: Place each donut on an individual 4×4-inch piece of parchment paper. This will make deep frying so much easier!

Pro Tip: For the second rise, refrigerate the donuts overnight. This allows for a slower, more controlled fermentation, resulting in better texture and flavor. Note: I haven’t tested this recipe beyond 12 hours in the refrigerator. Allow them to come to room temp 45 minutes prior to frying. 

yeast raised potato donut dough shaped on parchment

Setting Up Your Deep-Fry Station

I’m not the most organized person, but with deep frying having everything ready and in order is an absolute must! Ultimately, do what works best for you, but here’s the layout of my fry station:

On your Stove: Place your Dutch oven or pot on the front burner and fill it with about 3-4 inches of oil. Attach the candy thermometer to the side of the pot, ensuring it’s set to Fahrenheit or Celsius, depending on your preference.

To your Side: Have your spider strainer and/or tongs ready, ideally on a small heat-proof plate, for easy access.

To your Other Side: Line a baking sheet (half-sheet tray) with tin foil. Place a single layer of paper towels on top of the foil. Then, set the cooling rack on top of the paper towels. This is where your freshly fried donuts will go to cool.

Next to the Cooling Rack: Make sure your glaze (or cinnamon sugar) ready to go. Don’t make it too far in advance. I usually make the glaze while the oil is heating up to keep things moving smoothly.

Making the Maple Vanilla Glaze

In a medium-sized bowl (large enough to fit a donut comfortably—about 6 inches in diameter), combine the sifted powdered sugar, a pinch of salt, cinnamon, milk, vanilla extract, and maple syrup. Whisk the mixture until it’s smooth and creamy, then set aside.

Optional Cinnamon Sugar Topping: In a medium bowl, mix the sugar, cinnamon, and cardamom (optional). Set aside. 

How to Deep Fry Yeast-Raised Potato Donuts

Heat the Oil: Heat your oil to 360°F (182°C).

Prepare the Glaze: While the oil is heating, whisk together your glaze in a shallow dish large enough to easily accommodate a donut (around 6 inches or more in diameter).

Fry the Donuts: One at a time, lift each donut ring with the parchment paper and gently lower it into the hot oil.

Cook on One Side: Allow the donuts to fry for about 1 minute and 30 seconds, or until they achieve a deep golden brown color. If they look too pale, flip them back over and cook for another 20-30 seconds. The parchment paper should release from the donut, and you can remove it with your tongs.

Flip and Fry the Other Side: Flip the donut and fry the other side for another 90 seconds, or until both sides are evenly golden brown.

Rest the Donuts: Transfer the fried donuts to a cooling rack and let them rest for 30 seconds to 1 minute.

Glaze the Donuts: Once the donuts have cooled slightly, dip each one into the glaze, making sure to coat all sides and the interior. Set the glazed donut on the rack to allow the glaze to set.

Repeat: Repeat the fry process for the remaining donuts and donut holes. Keep in mind that donut holes will cook faster.


yeast raised potato donuts frying

Key Tips for Perfectly Fried Donuts

Deep frying may seem intimidating, but with the right tips, it’s easy to master! Here are some key tips for frying perfect donuts:

Temperature is Key: Maintain the oil temperature between 355°F and 360°F (ideally, right at 360°F). A little fluctuation is normal. If the oil gets too hot, reduce the heat or turn the burner off for a moment. You can also add a bit of room-temperature oil to cool it down. If the oil is too cool, let it heat back up before adding more donuts. Expect to make slight temperature adjustments throughout the frying process.

Do a Test Donut: Even when closely monitoring the temperature, it’s a good idea to test with a “sacrificial” donut (or donut hole). Choose your least perfect donut and fry it up. After it cools for a minute, break it open to check for doneness. The best part? You get a tasty snack!

Don’t Overcrowd the Pot: Limit the number of donuts to 2 or 3 at a time. Overcrowding can cause the oil temperature to drop and make it harder to control the frying process. If you’re new to frying, this also allows you to keep an eye on each donut’s fry time.

Let the Donuts Brown: Don’t shy away from letting your donuts achieve a deep, golden-brown color. Thanks to the baking soda, this isn’t burning—it’s what creates that perfect crisp texture and delicious flavor.

Glaze While Warm: To achieve a smooth, even glaze like the pros, dip the donuts while they’re still warm. If they cool too much, the glaze will become thicker and harder to apply. For cinnamon sugar, dip while warm to ensure it sticks well. Let the donuts rest for 30 seconds to 1 minute before glazing or dipping.

yeast raised potato donuts on a cooling rack

Storing Yeast-Raised Potato Donuts

The donuts will keep in an airtight container for up to 24 hours, but are best served shortly after frying or within the first 6 hours.  You can rewarm them in an oven or the microwave. 

While you can (surprisingly) freeze these donuts, I don’t necessarily recommend it as they quite simply just aren’t as good. However, if yo do freeze the donuts, allow them to come to room temperature and then give them 10 seconds in the microwave. 

fluffy yeasted potato donuts with maple vanilla glaze on a plate

This recipe was ever-so-slightly adapted from Stella Parks’s book Bravetart.

If you loved this Fluffy Yeast-Raised Potato Donut recipe, don’t forget to leave a 5-star 🌟🌟🌟🌟🌟 rating in the recipe card below! We’d love to hear from you—leave a comment to let us know how you enjoyed it!

fluffy yeast raised potato donuts on a cooling rack

Fluffy Yeast-Raised Potato Donuts with Maple Vanilla Glaze

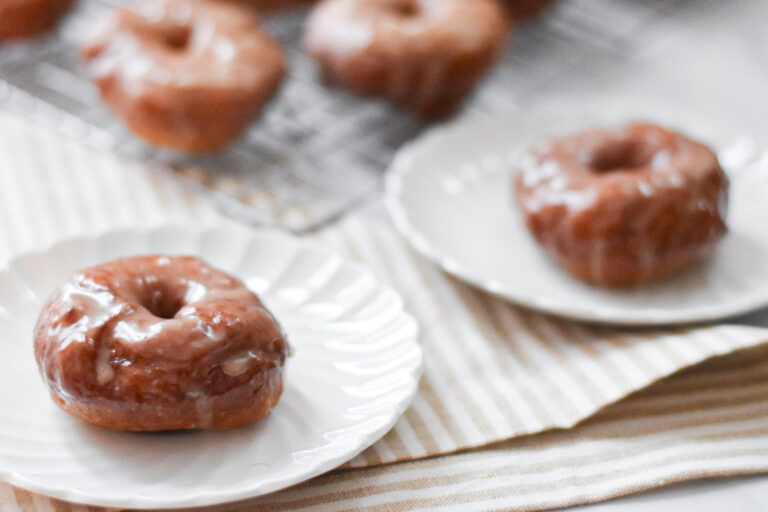
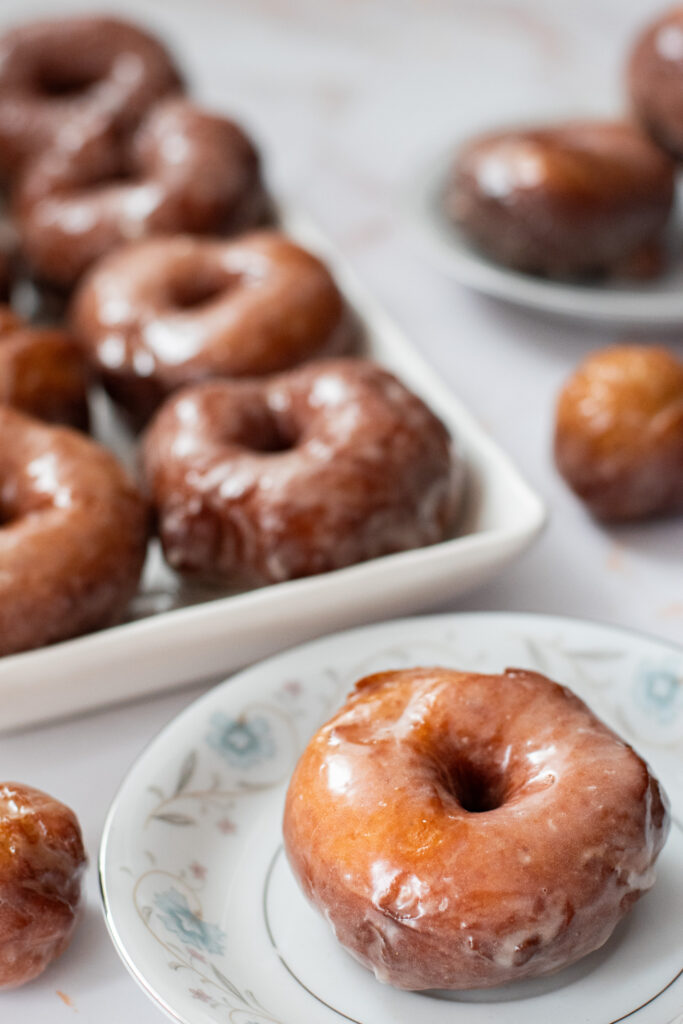
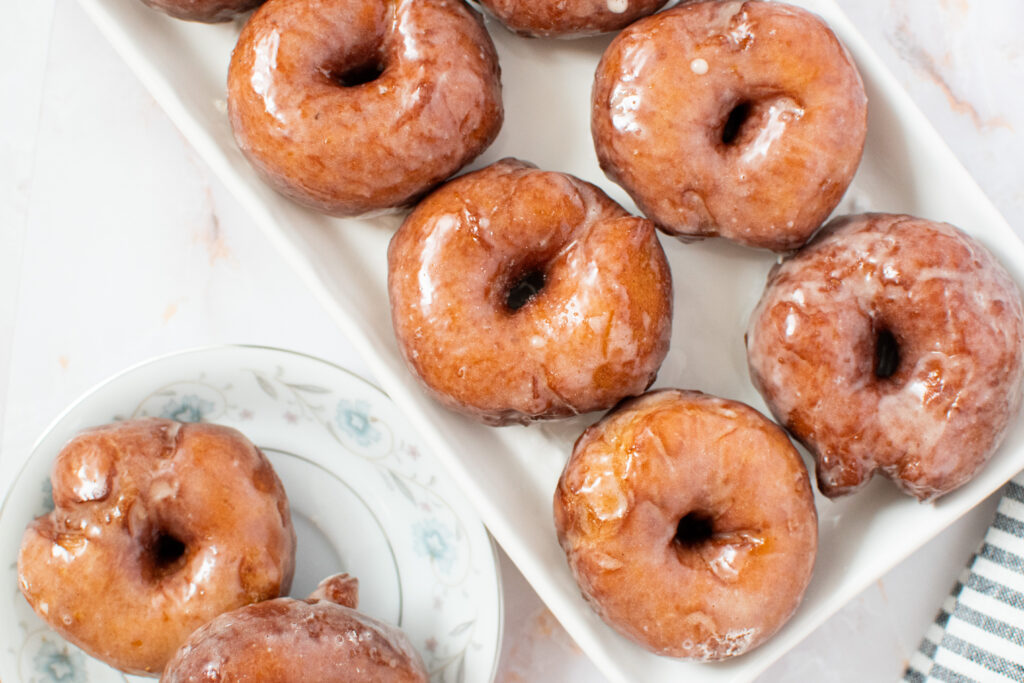
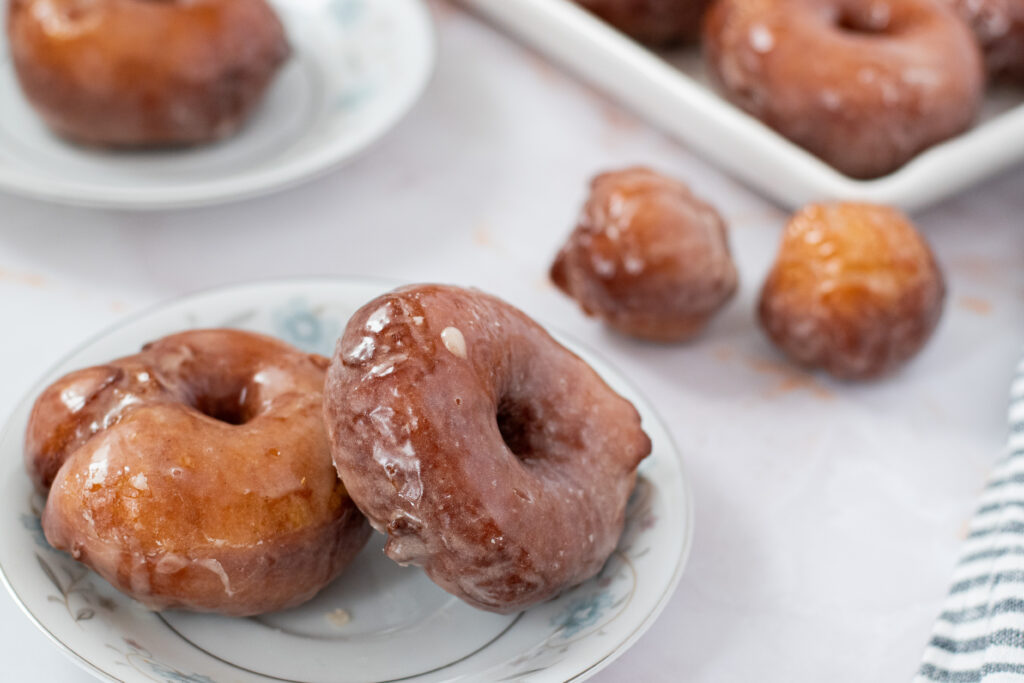
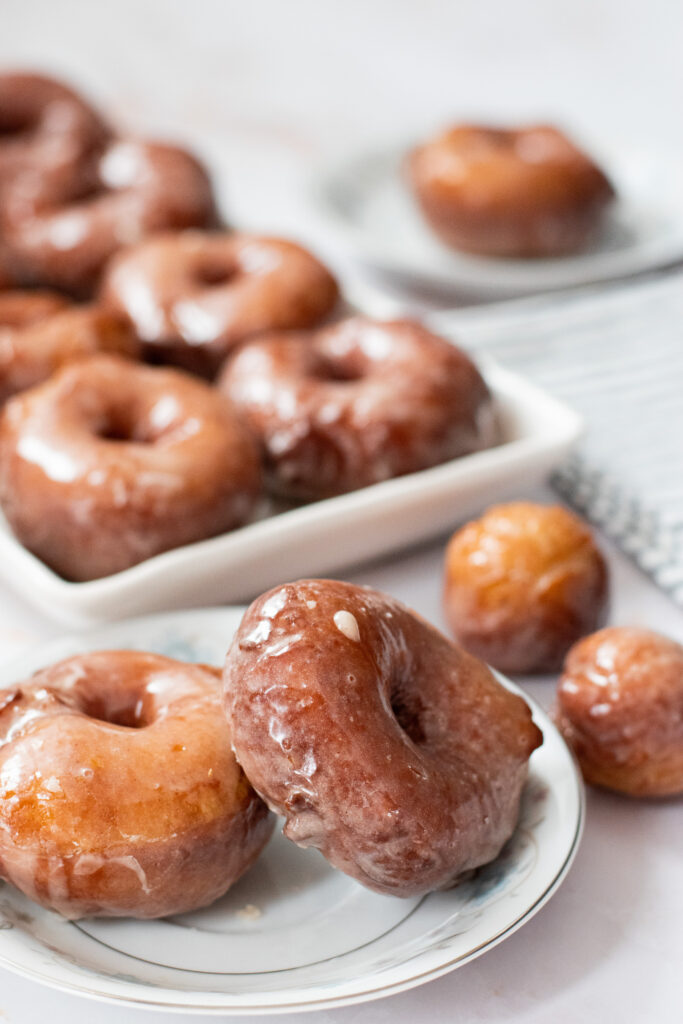
These fluffy yeast-raised potato donuts are hand-rolled and deep-fried to golden perfection. With the addition of mashed potatoes, these donuts are delightfully soft yet substantial. Dipped in a delicious, lightly spiced vanilla maple glaze, these donuts are made even more special. Don't be intimidated by this process - my recipe is intended to walk you through it step-by-step!
5 from 1 vote
Print Pin Rate
Course: Breakfast
Cuisine: American
Keyword: best donut recipe, Deep fried, fluffy donuts, glazed donuts, potato donuts, yeast donuts, yeast raised donuts
Prep Time: 35 minutes
Cook Time: 45 minutes
Proofing (2 proofs - 75 min each): 2 hours 30 minutes
Total Time: 3 hours 50 minutes
Servings: 16 (2.5 inch) donuts
Calories: 350kcal

Equipment

  • Fine mesh sieve or potato masher, for mashing potato
  • stand mixer, fitted with dough hook
  • Dutch oven or large pot, for deep frying
  • Tons, optional but very useful
  • spider strainer, or similar tool for scooping donuts out of oil
  • Candy thermometer, for measuring oil temperature
  • Half-sheet tray fitted with a cooling rack
  • Parchment paper cut sixteen 4x4 inch pieces of parchment paper

Ingredients

  • 1 medium 5 to 6-ounce russet potato, you'll use about 3 ounces/85 g for the recipe
  • 2¾ cups (12.5 ounces/354 g) All purpose flour, plus more as needed for kneading/mixing
  • 1/4 cup (1.5 ounces/50 g) granulated sugar
  • 1 ½ teaspoon instant dry yeast (not rapid rise)
  • 1 ½ teaspoon Diamond Crystal kosher salt, use half if iodized or Morton's kosher
  • 1/2 teaspoon grated nutmeg
  • 1/4 teaspoon cinnamon
  • 1/4 teaspoon baking soda
  • 1/2 cup (4 ounces) milk (any percentage), room temperature
  • 1 teaspoon vanilla extract
  • 4 tablespoons (2 ounces/56 g) unsalted butter, melted and warm about 115 ℉/61℃
  • 2 quarts vegetable oil or other neutral oil, refined coconut oil is ideal here, but can be hard to find in bulk

Glaze

  • 2 cups (240 g) confectioner's sugar, sifted
  • 1/4 teaspoon ground cinnamon
  • pinch salt
  • 1/4 cup milk, any percentage
  • 1/2 teaspoon vanilla extract
  • 1 tablespoon maple syrup, optional

Optional Cinnamon Sugar Coating (instead of glaze - or make 2 kinds!)

  • 1/2 cup (100 g) granulated sugar
  • 1 tablespoon ground cinnamon
  • 1/4 teaspoon ground cardamom (optional)

Instructions

Prep your Potato

  • Cook the Potato: Boil, steam, or bake the potato until it is fork-tender. Allow it to cool slightly before peeling it and pressing it through a fine-mesh sieve. Alternatively, you can mash it with a potato masher until finely mashed with no chunks.
  • Measure the Mashed Potato: Measure out 3 ounces (85 g, 3/4 cup gently spooned) potato and set aside to cool to room temp. Alternatively, you can refrigerate the mashed potato in an airtight container for about a week. Bring the potato to approximately 70℉ (21℃) prior to using.
    You'll have a little potato left over. You can refrigerate or freeze for later use. Keep in mind, we're using a potato that's a little bigger than what you actually need to ensure you have enough potato "meat" (no skin) for the recipe. Some discard is ok.

Make the Dough - First Rise

  • Whisk the Dry Ingredients: In the bowl of a stand mixer fitted with the dough attachment, whisk the flour, sugar, yeast, salt, nutmeg, cinnamon, and baking powder by hand.
  • Add the Wet Ingredients and Knead: To the same bowl, add the milk, vanilla, melted butter, egg, and prepared potato. Knead the dough on low speed for approximately 15 minutes until silky smooth.
    The dough should be sticky but pull away from the sides of the bowl. You may need to add 1-2 tablespoons of flour during the mixing process, so keep an eye on the dough.
  • First Rise: Transfer the dough to a lightly greased bowl, and allow to proof at room temperature for approximately 75 to 90 minutes (depending on the temperature of your kitchen/home). The dough will be light and puffy, but not necessarily double in size.
    Test the proof level: At the 60 to 65-minute mark, use a lightly floured finger to press into the dough. If the dough springs back quickly, it needs more time to rise, so let it proof for another 15 minutes. If the dough retains a shallow indentation without bouncing back, it is properly proofed.
    If the dough doesn't spring back at all, and sinks when you press on it, it is likely over-proofed. You may still proceed with the recipe but note the texture of the donuts will be affected. By testing the proof-level early on, you can prevent against over-proofing.
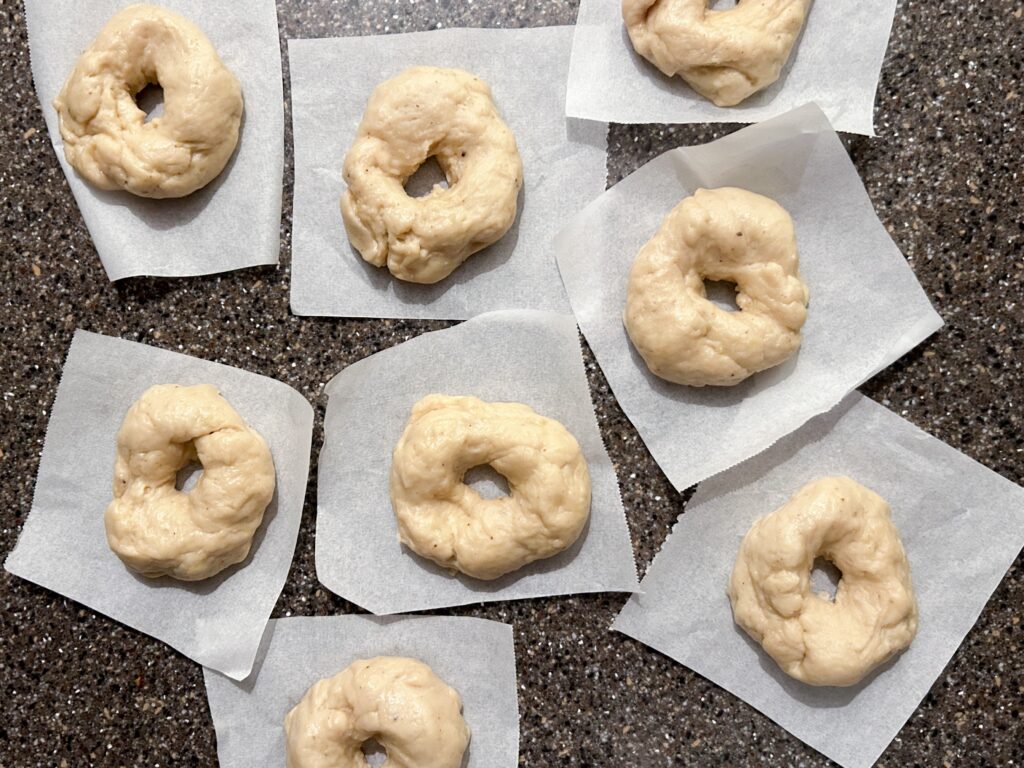
  • Shape the Donuts: Turn the proofed dough onto a lightly floured surface. Divide the dough into 16 even pieces (I like to make 14 full donuts and 4-6 mini donut holes for testing the fry oil).
    Cut 16 small, 4x4 inch squares of parchment paper and lay out on a flat surface or on a baking sheet. Each donut will be placed on its own little piece of parchment paper.
    Round the dough pieces into balls with your hands. Gently flatten one, and pinch through the center with your thumb and forefinger. Gently stretch the dough into a 3-inch ring. The donut ring will be a little misshapen, but that's okay! Do your best to ensure the ring is as even as possible (no super thin or super thick sides).
    Place the donut on one of the 4x4 inch pieces of parchment paper. Place on the baking sheet. Repeat shaping the donuts with the remaining pieces.
  • Second Rise: Cover the donuts lightly with plastic and let rise until approximately double in size, 75 to 90 minutes (depending on the temperature of your kitchen).
    Alternatively, you can refrigerate overnight and then bring to room temperature approximately 45 minutes prior to deep frying.

Deep Fry the Donuts:

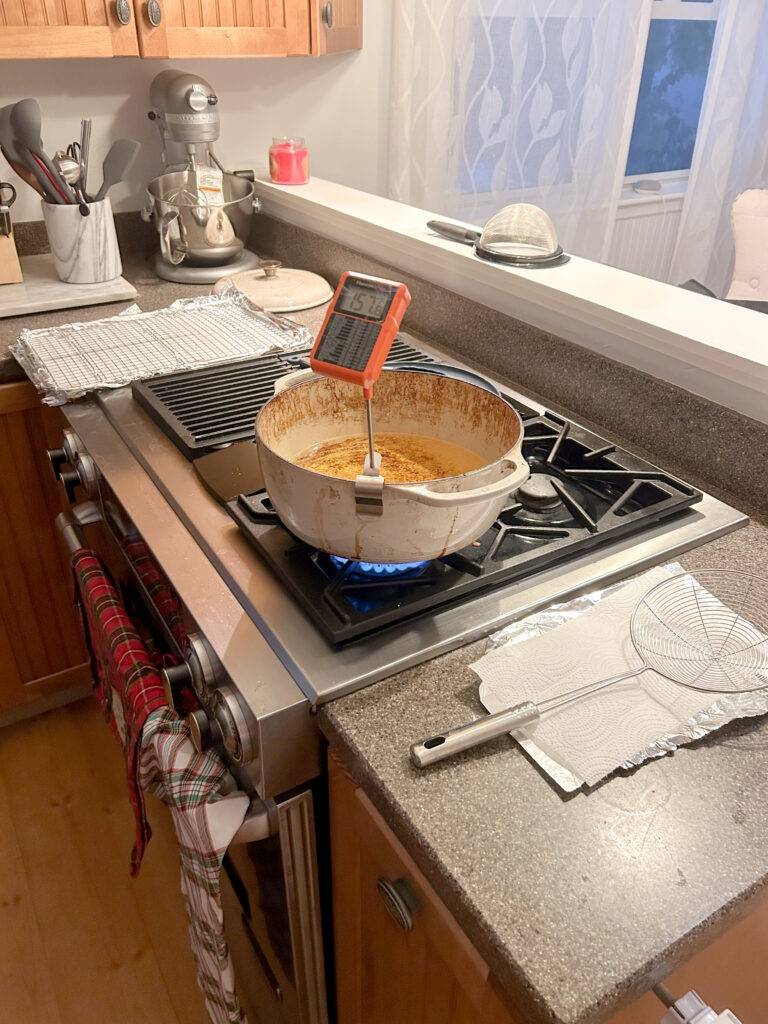
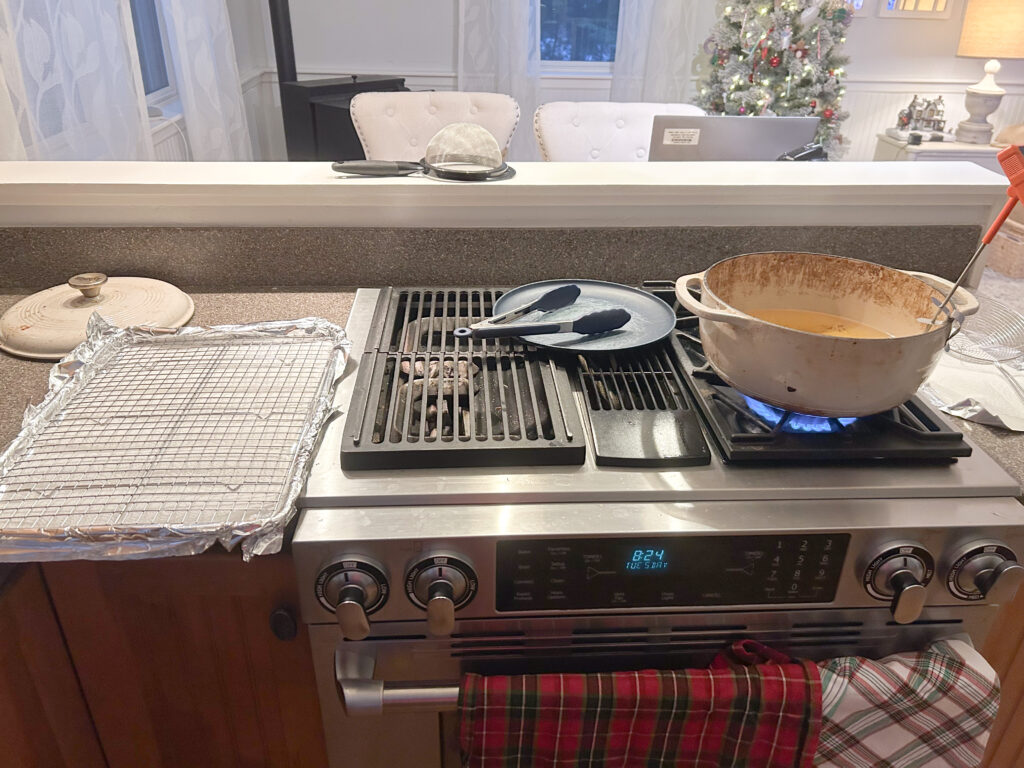
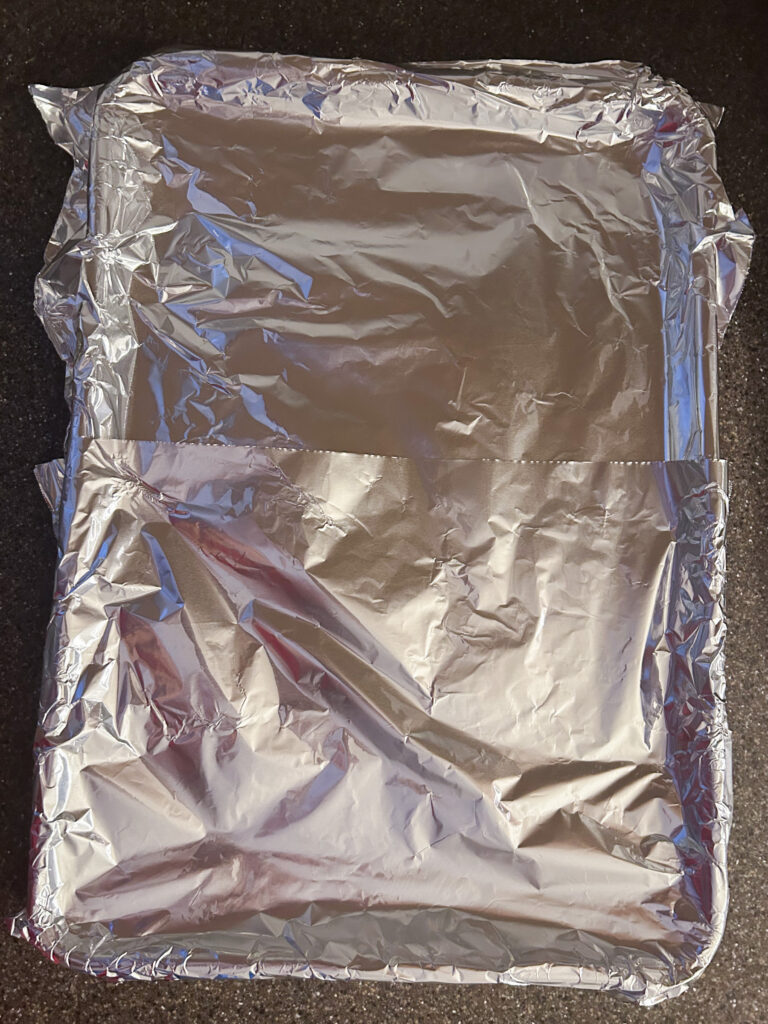
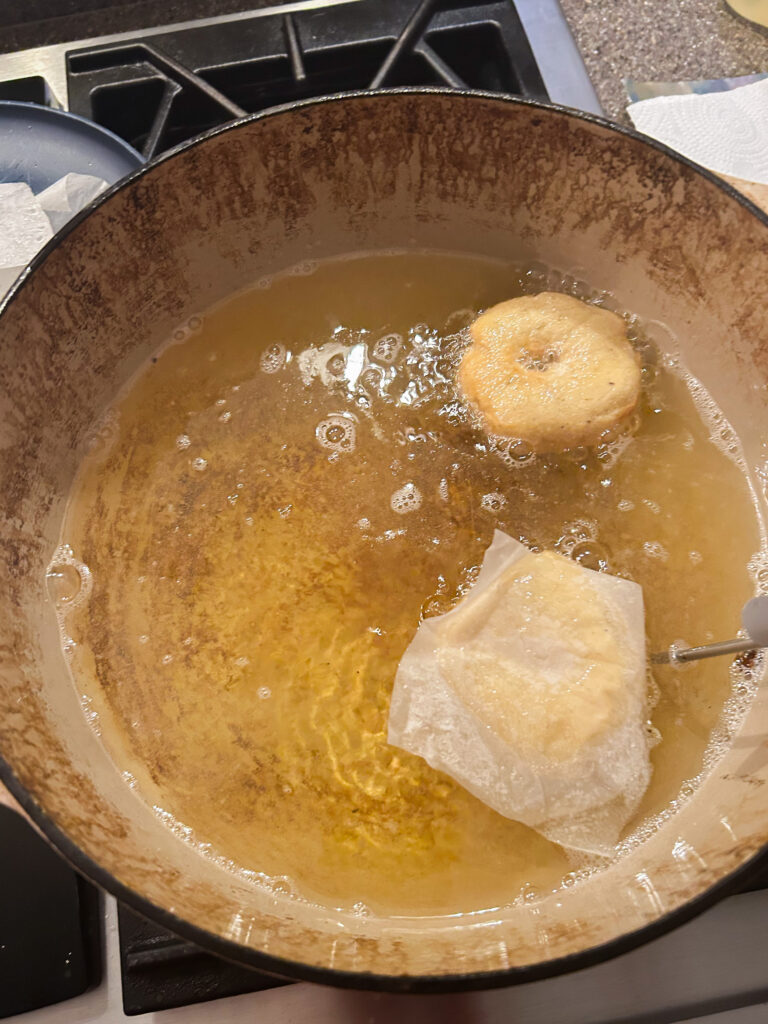
  • Prep your Workstation: Before you get into deep frying, it's important to set up your workstation. Line a large backing sheet with tin foil, and then a layer of paper towels. The paper towels will absorb the oil, and the tin foil (while optional), helps with easy clean-up. Place a cooling rack, approximately the same size as the pan, on top of the paper towels. You will place the hot donuts on the rack when they come out of the fryer.
    You'll want to have a medium-sized plate (or wide bowl) positioned near your pot or Dutch oven, with a set of tongs. You'll use this plate to discard the pieces of parchment paper when you pluck them out of the oil with the tongs (Note that you can scoop the parchment out with the spider strainer, but tongs are much easier to maneuver)
    Pour enough vegetable oil in your pot or Dutch oven to fill approximately 4 inches. Clip your candy thermometer to the edge of the pot, to ensure it is immersed in the oil and secure.
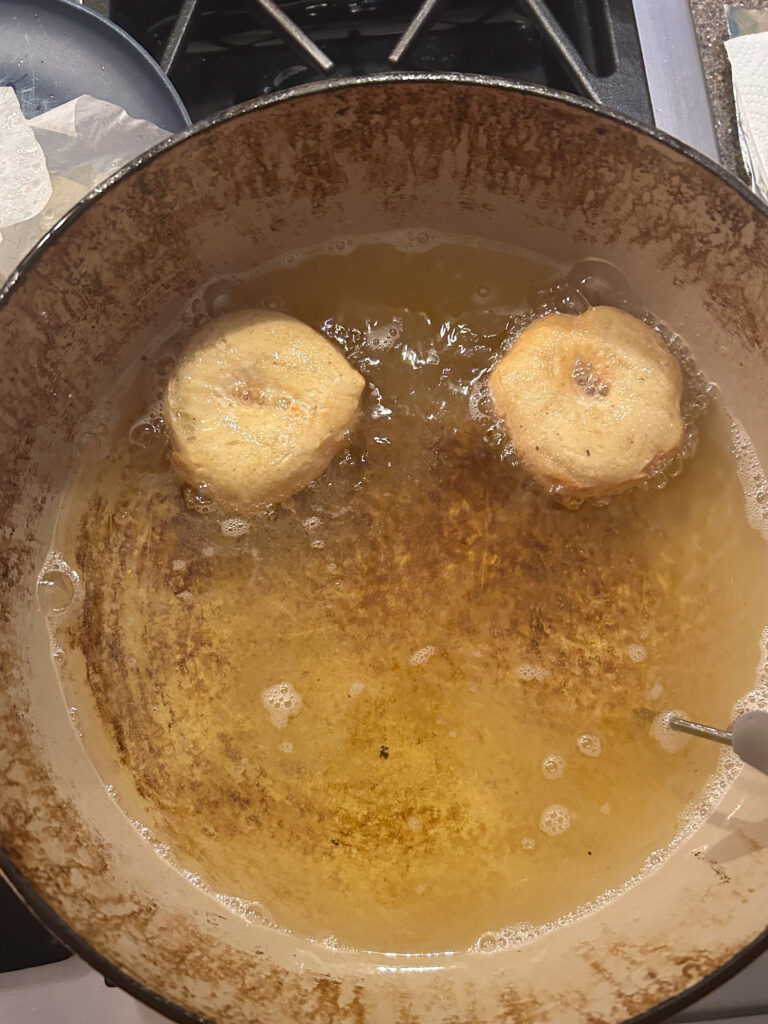
  • Heat the Oil: Turn the burner on medium, and begin to slowly heat the oil. You want the oil to reach approximately 360℉ (182 ℃). Ideally, you'll be keeping the oil in the range of 355 to 365℉ 179 - 185℃) for the duration of the deep-frying process.
  • Prep the Glaze: As the oil comes to temperature, in a medium bowl, combine the confectioner's sugar, cinnamon, salt, milk, vanilla, and maple syrup (if using). Whisk until thoroughly combined. Set aside next to your baking tray/cooling rack set-up.
    The bowl should be wide enough to dip your donuts in.
  • Prep your OPTIONAL Cinnamon Sugar Topping: In a medium bowl, mix the sugar, cinnamon, and cardamom (if using). Set aside next to your baking tray/cooling rack set-up.

Deep Fry the Donuts:

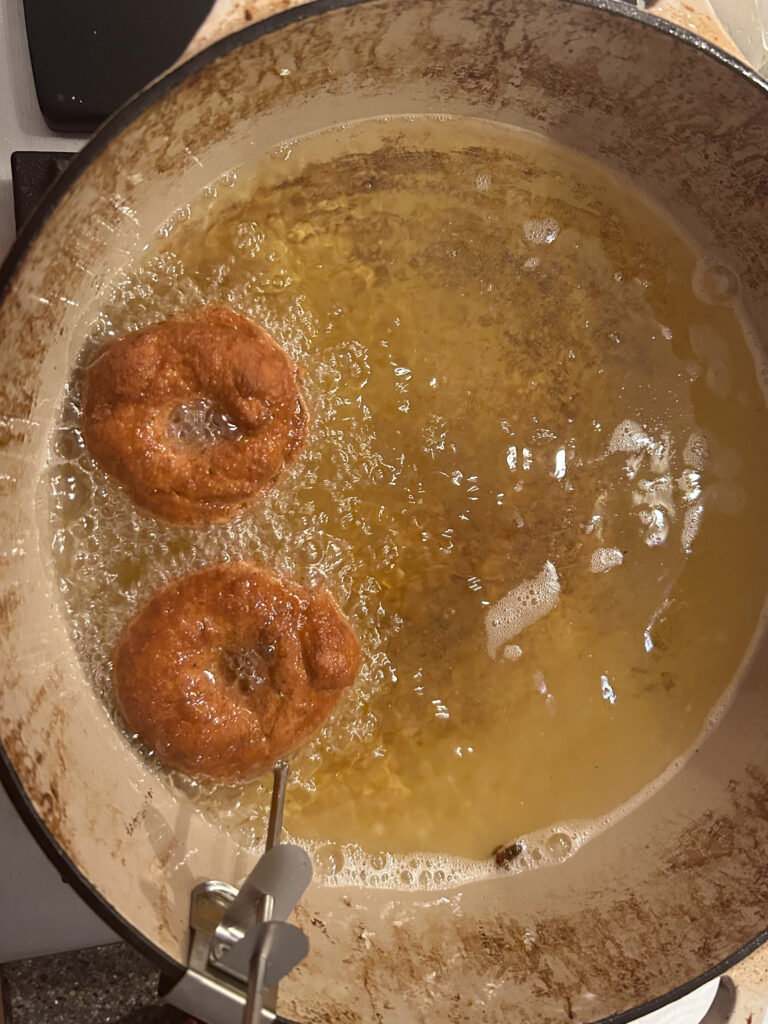
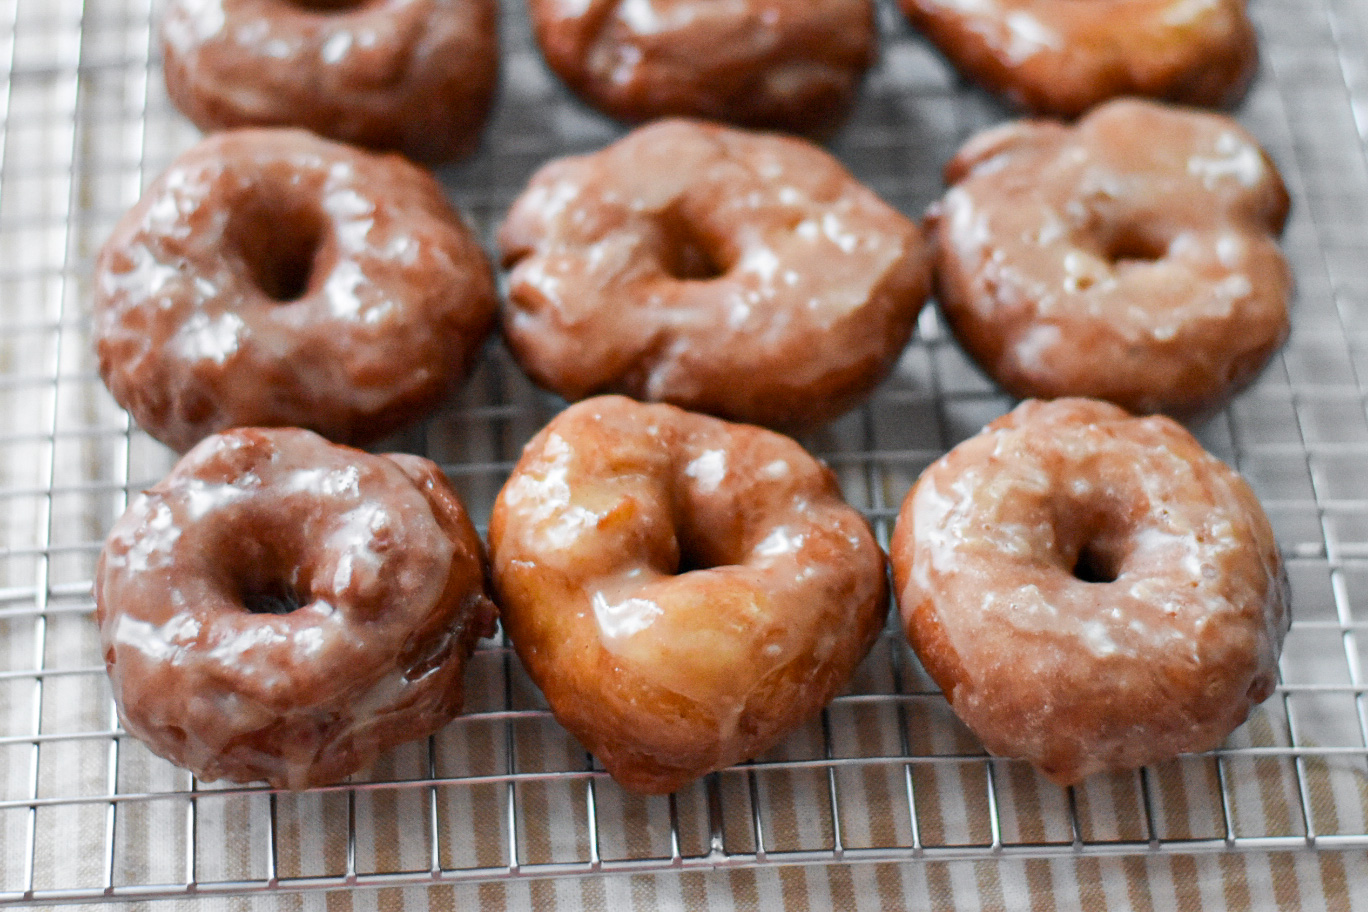
  • Deep Fry the Donuts: Once the oil has reached 360℉ (182 ℃), carefully place the doughnuts into the hot oil, two or three at a time. You can leave them on the parchment paper - it will naturally separate in the oil, and you can remove it with tongs.
    Fry the doughnuts for roughly 3 minutes, flipping them halfway, until they turn golden brown. Use a slotted spoon to take them out of the oil and set them on a cooling rack. The donut holes should take anywhere between 1 minute and 30 seconds to 2 minutes.
    Doneness Indicator: Properly fried donuts should be deep golden brown and float to the surface when ready. Since they have baking soda, these donuts may appear to brown a lot, but that's totally okay and exactly what you're looking for!
    Tip: Check the first batch—if they’re golden brown but not too dark, the oil is at the correct temperature. If they’re undercooked inside or too greasy, adjust the temperature and try again.
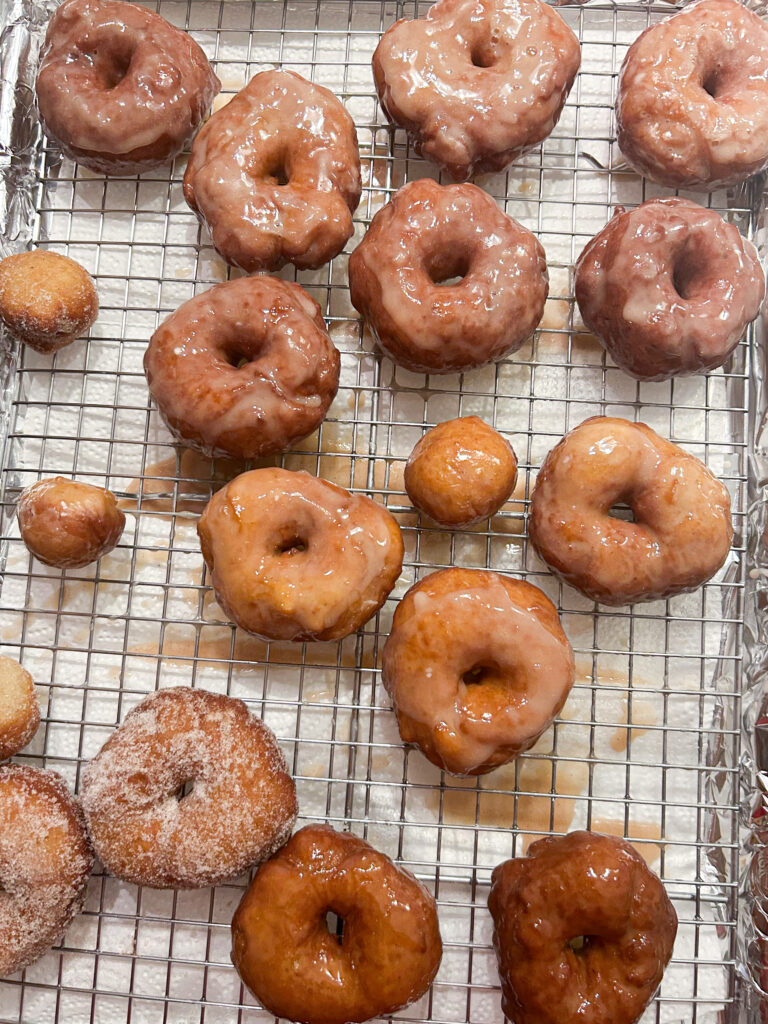
  • Coat the Donuts: Allow the freshly fried donuts to cool on the rack for 30 seconds and then dip them into the prepared glaze (or cinnamon sugar coating), ensuring they are completely coated.
    Note: If you're doing both cinnamon sugar AND glaze - remember that you only want to dip each donut into one type of topping. .
  • Repeat the Process with Remaining Dough: Repeat the deep fry process with the remaining donuts. Allow to cool on the rack.
    If your oil temperature gets too hot, turn it down or temporarily turn the burner off until the temperature reaches the desired range.
    see notes for additional tips on oil temperature.
  • Enjoy the fruits of your labor! The donuts are best eaten the day they are made but can be stored at room temperature for up to 24 hours. Store, lightly covered, in a container. Refresh in the microwave before eating if desired.

Notes

Recipe Adapted from Bravetart - Stella Parks
  • Make Ahead: You can make the donut dough the day/night before. During the second rise, the donut dough can stay in the refrigerator for up to 12 hours.  Simply remove the prepared donut dough from the refrigerator approximately 45 minutes to 60 minutes prior to frying (depending on the temperature of your kitchen).

Nutrition

Calories: 350kcal

You may also like

1 comment

Jenna January 12, 2025 - 12:09 pm

5 stars
Thorough and easy to follow recipe!!

Reply
5 from 1 vote

Leave a Comment

Recipe Rating


This website uses cookies to improve your experience. We'll assume you're ok with this, but you can opt-out if you wish. Accept Read More

Privacy & Cookies Policy